Languages and frameworks: HTML
Right-click a project or a directory in the Solution Explorer and choose .
In the dialog that opens, type the name of the new file without any extension. You can type the whole directory structure before the new filename. If the nested directories do not yet exist, they will be created:

JetBrains Rider creates a stub file based on the HTML file template and opens it in the editor.


Select the code fragment to wrap and press or select from the main menu.
From the list, select Wrap with Tag. JetBrains Rider encloses the selection in a pair of brackets (
<>and</>).Type the tag inside the opening brackets
<>. JetBrains Rider automatically fills in the tag in the closing brackets</>.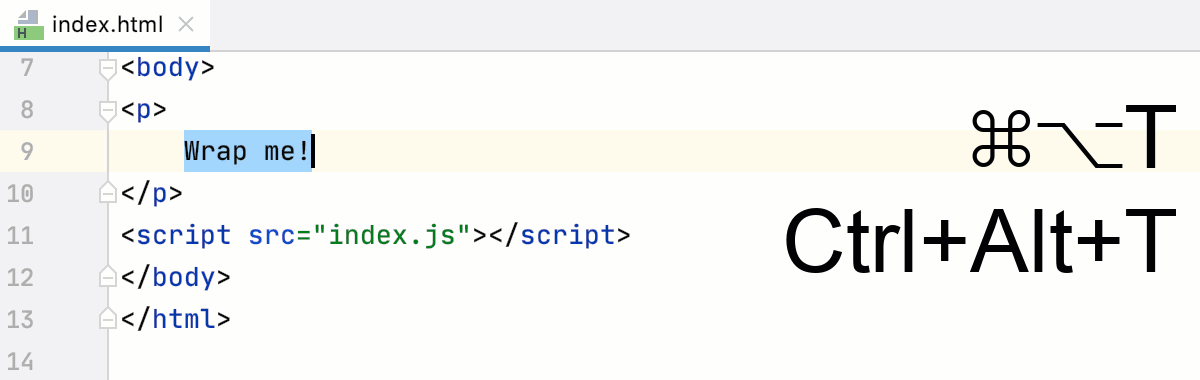 Gif
Gif


note
Compatibility is checked only for Chrome, Chrome Android, Safari, Safari iOS, Firefox, Internet Explorer, and Edge.

To turn off showing documentation automatically when you hover over code symbols, Click
 in the popup and disable the Show on Mouse Move option.
To have the Documentation popup shown faster or slower, open the Settings/Preferences dialog (CtrlAlt0S) , go to , then select the Show the documentation popup checkbox and specify the delay time.
note
The preview functionality relies on the JetBrains Rider built-in web server. This server is always running and does not require any manual configuration.
By default, the built-in server port is set to 63342 through which JetBrains Rider accepts connections from services. To change this default value, open the Settings/Preferences dialog (CtrlAlt0S) , go to , and in the Built-in Server specify any other value starting from 1024.

In the main menu, go to , and then select
 from the list.
Alternatively, hover over the code to show the browser icons popup, and click
.
warning
Automatic reload doesn't work when the page is uploaded to a manually configured default web server. For more information about managing plugins, refer to Configuring synchronization with a web server and Default server configuration.
Go to , and then select the desired browser from the list.
To open the default JetBrains Rider browser, select Default.
Alternatively, hover over the code to show the browser icons popup, and click the icon that indicates the desired browser:


If you have only one browser configured, just press AltF2.


Right-click an image in the editor and select Edit Path to External Editor… from the context menu.
You can also press Ctrl0Q and type
Edit Path to External Editor.In the Path to External Editor dialog, specify the path to the application in which you want to open images and click Save.

To add a single HTML tag to the list of known custom tags, place the caret to the highlighted tag, press AltEnter and choose Add [tag] to custom HTML tags.

To configure multiple custom HTML tags, go to the page of the Settings/Preferences dialog (CtrlAlt0S) , find the inspection, and configure the list of custom HTML tags in the inspection options on the right.

Press CtrlAlt0S to open settings and select Editor | General | Inline Completion.
Select the Enable local Full Line completion suggestions checkbox and make sure the HTML checkbox is selected.

Press CtrlAlt0S to open settings and select Editor | General | Inline Completion.
Select the Enable cloud completion suggestions checkbox and make sure the HTML checkbox is selected.
