RustRover includes an embedded terminal emulator for working with your command-line shell from inside the IDE. Use it to run Cargo commands, Git commands, set file permissions, and perform other command-line tasks without switching to a dedicated terminal application.
Enable the Terminal plugin
This functionality relies on the Terminal plugin, which is bundled and enabled in RustRover by default. If the relevant features are not available, make sure that you did not disable the plugin.
Press CtrlAlt0S to open settings and then select Plugins.
Open the Installed tab, find the Terminal plugin, and select the checkbox next to the plugin name.
Initially, the terminal emulator runs with your default system shell, but it supports many other shells, such as Windows PowerShell, Command Prompt cmd.exe, sh, bash, zsh, csh, and so on. For more information about changing the shell, refer to Terminal settings.
Open the Terminal tool window
Go to View | Tool Windows | Terminal or press AltF12.
By default, the terminal emulator runs with the current directory set to the root directory of the current project. For more information about changing the default start directory, refer to Terminal settings.
Right-click any file (for example, in the Project tool window Alt01 or any open editor tab) and select Open in | Terminal to open the Terminal tool window with a new session in the directory of that file.
tip
You can open the terminal as an editor tab: right-click the Terminal tool window header and select Move to Editor.
Start a new local session
To start a new session in a separate tab, click on the toolbar or press CtrlShift0T.
To run multiple sessions inside a tab, right-click the tab and select Split Right or Split Down in the context menu.
The Terminal saves tabs and sessions when you close the project or RustRover. It preserves tab names, the current working directory, and even the shell history.
To close a tab, click on the Terminal toolbar or press CtrlF4.
Press Alt0→ and Alt0← to switch between active tabs. Alternatively, you can press Alt0↓ to see the list of all terminal tabs.
To clear the terminal screen, press Ctrl0L.
tip
Configure shortcuts for the terminal actions in the IDE settings (CtrlAlt0S), under Keymap | Plugins | Terminal.
Start a new SSH session
On the toolbar, click and select New SSH Session.
Enter the address of the host to which you want to connect, and provide authentication data.
Or, if you have configured SSH configurations, you can select one of them from the list.
To terminate the connection, click in the terminal tab.
Rename terminal tab
Right-click the tab and select Rename Session from the context menu.
tip
Just like with system terminal tabs, you can rename RustRover Terminal tabs programmatically. For example, use title MyTitle if your interpreter is Windows Command Prompt or echo -en "\033]0;MyTitle\a" for bash and zsh. This feature is available if the Show application title checkbox is selected in Advanced Settings.
Search in terminal
To search for a certain string in a terminal session, press Ctrl0F. This searches all text in the session: the prompt, commands, and output.
By default, the search is not case-sensitive. You can click Match case in the search field to make it case-sensitive.
Configure the terminal emulator
Press CtrlAlt0S to open settings and then select Tools | Terminal.
Alternatively, click on the Terminal toolbar and select Settings.
The new terminal currently supports the Zsh, Bash, and PowerShell shells.
Along with its improved look and feel, other major features include:
Separation of command output into distinct visual blocks. Press Ctrl0↑ to navigate to the output area and Ctrl0↓ to switch to the input area. Use the 0↑ and 0↓ arrow keys to navigate the output area blocks.
Command completion, including completion for command names, arguments, flags, and paths. For each suggested value, the new terminal displays quick documentation.
note
For the cargo test command, the new terminal suggests available test functions, as well as entire modules containing test functions. This allows you to decide whether you want to run a specific test or a group of tests.
Completion for command names and arguments is available as you type them, but you can also press CtrlSpace or Tab after a command name to get the list of possible arguments.
To display the history of commands that you have previously entered, press 0↑ in the input area.
Enable New Terminal
Open the Terminal tool window: View | Tool Windows | Terminal.
In the tool window header, click and select Enable New Terminal.
Alternatively, open the IDE settings (CtrlAlt0S) and go to Tools | Terminal | Enable New Terminal.
Search in output blocks
While the full text buffer remains searchable, the new terminal also enables searching within specific output blocks.
In the Terminal tool window, press Ctrl0F.
In the search dialog than opens, click (Search in block) and type the keyword you are looking for.
This narrows the search to only the output block that is currently selected. You can click any block to select it or use the 0↑ and 0↓ arrow keys to navigate them.
Configure prompt style
By default, RustRover shows the terminal prompt on two lines with the input below the prompt. You can customize it to apply the single-line style or use the prompt settings from your shell.
Open the IDE settings (CtrlAlt0S) and go to Tools | Terminal.
In the Prompt style list, select one of the following:
IDE single-line prompt: show the input at the same line as the prompt.
IDE double-line prompt: show the input below the prompt (default behavior).
Shell prompt (PS1): use the prompt style configured in your shell.
Alternatively, right-click the prompt in the Terminal tool window and select a prompt style.
Use AI Assistant to generate terminal commands
note
This functionality relies on the AI Assistant plugin that requires an additional license.
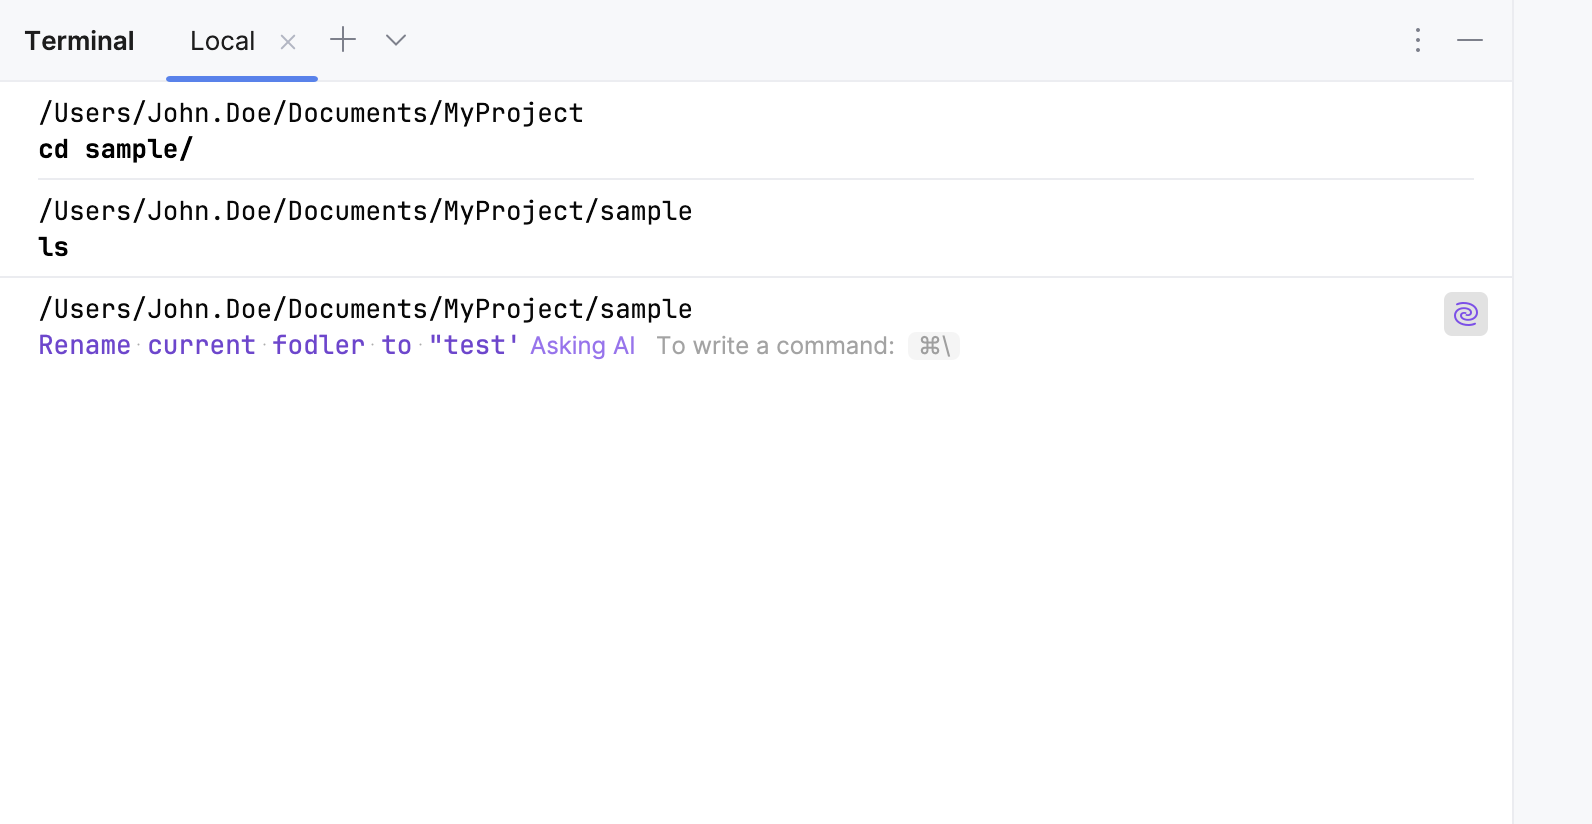
In addition to standard shell commands, you can type any text in the Terminal, for example, Rename current folder. If RustRover identifies the input as a natural language, the AI mode will be enabled automatically. If your query is not recognized as a prompt, you can enable it manually.
In the Terminal tool window, click (Ask AI Assistant) or press .
Type your query and press Enter.
AI Assistant will generate a command taking into account the shell that you are using and your terminal context, such as the name of the current directory and the output of the previous commands.
Press Enter again to run this command.
Gif
tip
Some terminal commands, such as check or copy, may resemble natural language queries. As a result, AI Assistant might interpret them as part of your prompt instead of terminal commands. If you want your input to always be treated as a terminal command, you can disable the natural language detection feature. In the tool window header, click and clear the Detect Natural Language option.
Terminal settings
Project Settings
These settings affect the terminal only for the current project:
Start directory
Specify the working directory where every new shell session should start. By default, it starts in the root directory of the current project.
Environment variables
Specify custom environment variables for every new shell session.
Application Settings
These settings affect the terminal in any project that you open with the current RustRover instance:
Shell path
Specify the shell that will run by default. RustRover should automatically detect the default shell based on your environment. Here are some examples of different shells:
Bash: /bin/bash
Z shell: /bin/zsh
Bash for Windows: bash.exe
WSL: wsl.exe
PowerShell: powershell
Command Prompt: cmd.exe
Cygwin: "C:\cygwin\bin\bash.exe" --login -i
Default tab name
Specify the default name for new tabs.
Audible bell
Play the bell sound on various events.
Close session when it ends
Close the current session when the corresponding process ends (for example, by kill).
Mouse reporting
Enable the mouse pointer support in the embedded local terminal.
Copy to clipboard on selection
Copy text selected in the terminal to the clipboard.
Paste on middle mouse button click
Paste clipboard contents by clicking the middle mouse button.
Override IDE shortcuts
Use shell-specific shortcuts instead of IDE shortcuts when the Terminal tool window is active.
Click Configure terminal keybindings to open the settings page and configure the shortcuts that are available in the Terminal tool window under Plugins | Terminal. For example, Switch Focus to Editor is mapped to Esc by default, which means that if you don't override the IDE shortcuts, Escape will switch focus from the terminal to the editor.
Shell integration
Integrate the terminal with the system shell to properly keep track of your command history for sessions and load a custom config file with required environment variables.
Shell integration works for sh, bash, zsh, and fish shells.
Highlight hyperlinks
Highlight HTTP links in the terminal and make them clickable.
Detect and highlight commands that can be used as IDE features instead of running them in the terminal and reading console output.
When enabled, instead of pressing Enter, which runs the command in the terminal, press CtrlEnter to open the corresponding GUI element.
Cursor shape
Select the shape of the cursor: block, underline, or vertical.
The embedded terminal emulator also inherits the following IDE settings:
On the Keymap settings page, you can configure the copy Ctrl0C and paste Ctrl0V shortcuts.
On the Editor | General | Appearance page, you can configure blinking frequency for the caret. The Terminal does not inherit the Use block caret option because there is a separate option for that: Cursor shape.
On the Editor | Color Scheme | Console Font page, you can configure line spacing and fonts.
On the Editor | Color Scheme | Console Colors page, you can configure font colors.
On the Editor | Color Scheme | General page, you can configure the selection foreground and background colors.

 on the toolbar or press CtrlShift0T.
")
 and select New SSH Session.


 and select Enable New Terminal.
 (Search in block) and type the keyword you are looking for.

 (Ask AI Assistant) or press .