Configuring Your User Profile
To get to your user profile settings, click your avatar in the header and select Profile from the drop-down menu.
Changing Your Password
If built-in authentication is configured, TeamCity server maintains passwords for the user authentication. You can change the password in Your Profile | General | Built-in Authentication. Enter an existing and new passwords and click Save changes.
The password can only be changed for the built-in authentication. If you do not see these fields, this means that TeamCity is configured to use external authentication and the password should be changed in the corresponding external system.
You can reset your built-in authentication password using the Reset password link on the sign-in page.
If you change or reset your password, TeamCity will automatically sign you out of all sessions.
Managing Access Tokens
If token-based authentication is enabled on the TeamCity server, you can create access tokens and use them for authentication:
instead of your password (for example, in scripts or IDE plugin login), or
as the value of the
Authorization: Bearer <token-value>HTTP header. For instance, in REST API requests:curl --header "Authorization: Bearer <token-value>" http://<host>:<port>/app/rest/builds
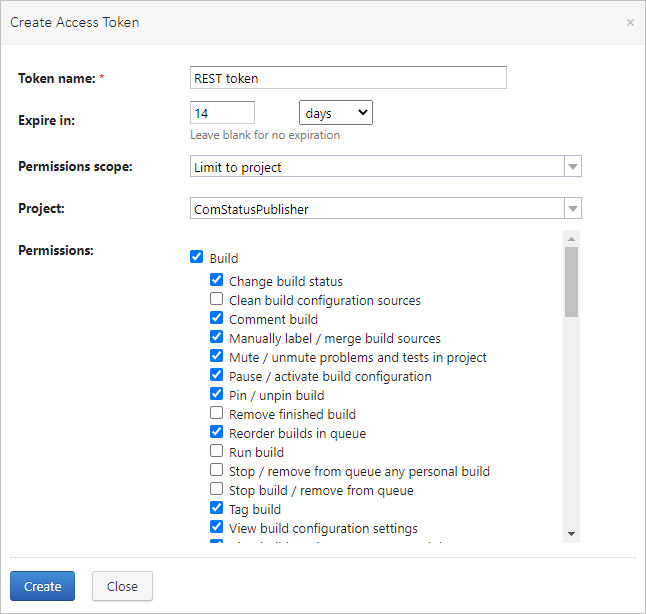
You can manage tokens in Your Profile | Access Tokens. Note that the token value is only available during token creation and is not possible for retrieval afterwards.
To automatically revoke a token after its expiration, specify its time limit.
You can create tokens with limited permissions. By default, the Permissions scope field value is set to " Same as current user ", which means that the created token will grant the same permissions as those of the current user.
If you change the value to " Limit per project ", you will be able to limit the token's access to a certain project and select particular permissions for it. The list of available projects and their permissions depend on your user permissions.

Note that some operations allowed by enabled permissions might be blocked by the absence of other permissions. Please make sure to thoroughly manage the token's scope to get predictable results of your requests. In case of any issues, you can contact us via any convenient feedback channel.
Managing Version Control Username Settings
In Your Profile | General, you can see the list of your version control usernames in the Version Control Username Settings area.
By default, TeamCity uses your login name as the VCS username. Click Edit to provide actual usernames for version control systems you use. Make sure the usernames are correct.
These settings are not used for authentication for the particular VCS, and so on.
These settings enable you to:
track your changes status on the Changes,
highlight such builds on the Projects page if the appropriate option is selected,
notify you on such builds when the Builds affected by my changes option is selected in notifications settings.
Configuring Two-Factor Authentication
TeamCity administrators can enable two-factor authentication (2FA) on the whole server. In this case, you will be prompted to configure 2FA settings for your user account. To do this:
Download and install any suitable authenticator app on your mobile device: for example, Google Authenticator or Microsoft Authenticator.
In TeamCity, open Your Profile | Two-factor Authentication.
Scan the generated QR code with the authenticator app, or enter the provided key manually (choose "time-based" as the key type).
Enter the numeric code generated by the app to TeamCity.
Save the provided recovery keys to a secure place. They will be needed if you ever lose access to the authenticator.
Save the settings.
Next time you will be signing in to TeamCity, it will prompt you to enter the confirmation code from the authenticator.
Customizing UI
In Your Profile | General, you can customize the following UI settings:
Highlight my changes and investigations: Select to highlight builds that include your changes (changes committed by a user with the VCS username provided in the Version Control Username Settings section) and problems you were assigned to investigate on the Projects page, Project Home page, Build Configuration Home page.
Show date/time in my timezone: Check the option, if you want TeamCity to automatically detect your time zone and show the date and time (for example, build start, VCS change time, and so on) according to it.
Show all personal builds
Add builds manually triggered by you to your favorites.
Viewing your Roles and Permissions
In Your Profile | Groups, you can view the list of user groups you are assigned to.
In Your Profile | Roles, you can view your roles and permissions in different projects. Note that roles are assigned to a user by the system administrator.
Managing Notification Rules
In Your Profile | Notification Rules, you can view what notification rules you inherit from your user group and create new personal rules.
Uploading Avatar
Users can upload their avatars in the user profile. The avatars are displayed around the TeamCity UI, next to the changes (commits) of their authors. Only users with the View all users permission can see them.
When a user signs in to TeamCity via a third-party account for the first time, TeamCity automatically fetches their avatar from the external system. Note that TeamCity will only be able to access avatars of users with verified emails (if you are using GitLab, ensure that a public email is set in your account).
It is possible to upload a different avatar in the TeamCity user profile settings afterwards.