Create and run Spark application on cluster
This tutorial covers a basic scenario of working with Spark: we'll create a simple application, build it with Gradle, upload it to an AWS EMR cluster, and monitor jobs in Spark and Hadoop YARN.
We'll go through the following steps:
Create a new Spark project from scratch using the Spark project wizard. The wizard lets you select your build tool (SBT, Maven, or Gradle) and JDK and ensures you have all necessary Spark dependencies.
Submit the Spark application to AWS EMR. We'll use a special gutter icon, which creates a ready-to-use run configuration.
This functionality relies on the Spark plugin, which you need to install and enable.
Press CtrlAlt0S to open settings and then select Plugins.
Open the Marketplace tab, find the Spark plugin, and click Install (restart the IDE if prompted).
tip
If you are using Spark with Scala, you also have to install the Scala plugin.
In the main menu, go to File | New | Project.
In the left pane of the New Project wizard, select Spark.
Specify a name for a project and its location.
In the Build System list, select Gradle.
In the SDK list, select JDK 8, 11, or 17.
Under Artifact Coordinates, specify the group ID and version.

Click Create.
This will create a new Spark project with a basic structure and the build.gradle with Spark dependencies.
In the created project, right-click the src | main | scala folder (or press AltInsert) and select New | Scala Class.
In the Create New Scala Class window that opens, select Object and enter a name, for example
SparkScalaApp.Write some Spark code. If you use the
getOrCreatemethod of theSparkSessionclass in the applicationmainmethod, a special iconwill appear in the gutter, which lets you quickly create the run Spark Submit configuration.
For example:
Sample Spark application{...}
The Spark Submit run configuration requires SSH access to an AWS EMR cluster to run the spark-submit command on it.
Create a connection to AWS EMR if you don't already have one.
Open the AWS EMR tool window: View | Tool Windows | AWS EMR.
Select a cluster, open the Info tab and click Open SSH Config.
In the SSH Configurations window that opens, check the authentication parameters and provide the path to a private key file. To verify this configuration, click Test connection.
tip
Besides run configurations, you can use the SSH configuration to connect to the cluster master node by clicking
and to connect to it over SFTP by clicking
.
With the dedicated Spark Submit run configuration, you can instantly build your Spark application and submit it to an AWS EMR cluster. To get artifact to be uploaded to AWS EMR, you can use Gradle tasks, IntelliJ IDEA artifacts, or select an existing JAR file. In this tutorial, we'll use Gradle.
In the gutter, click
next to the
getOrCreatemethod.
Select Create Spark Submit Configuration.
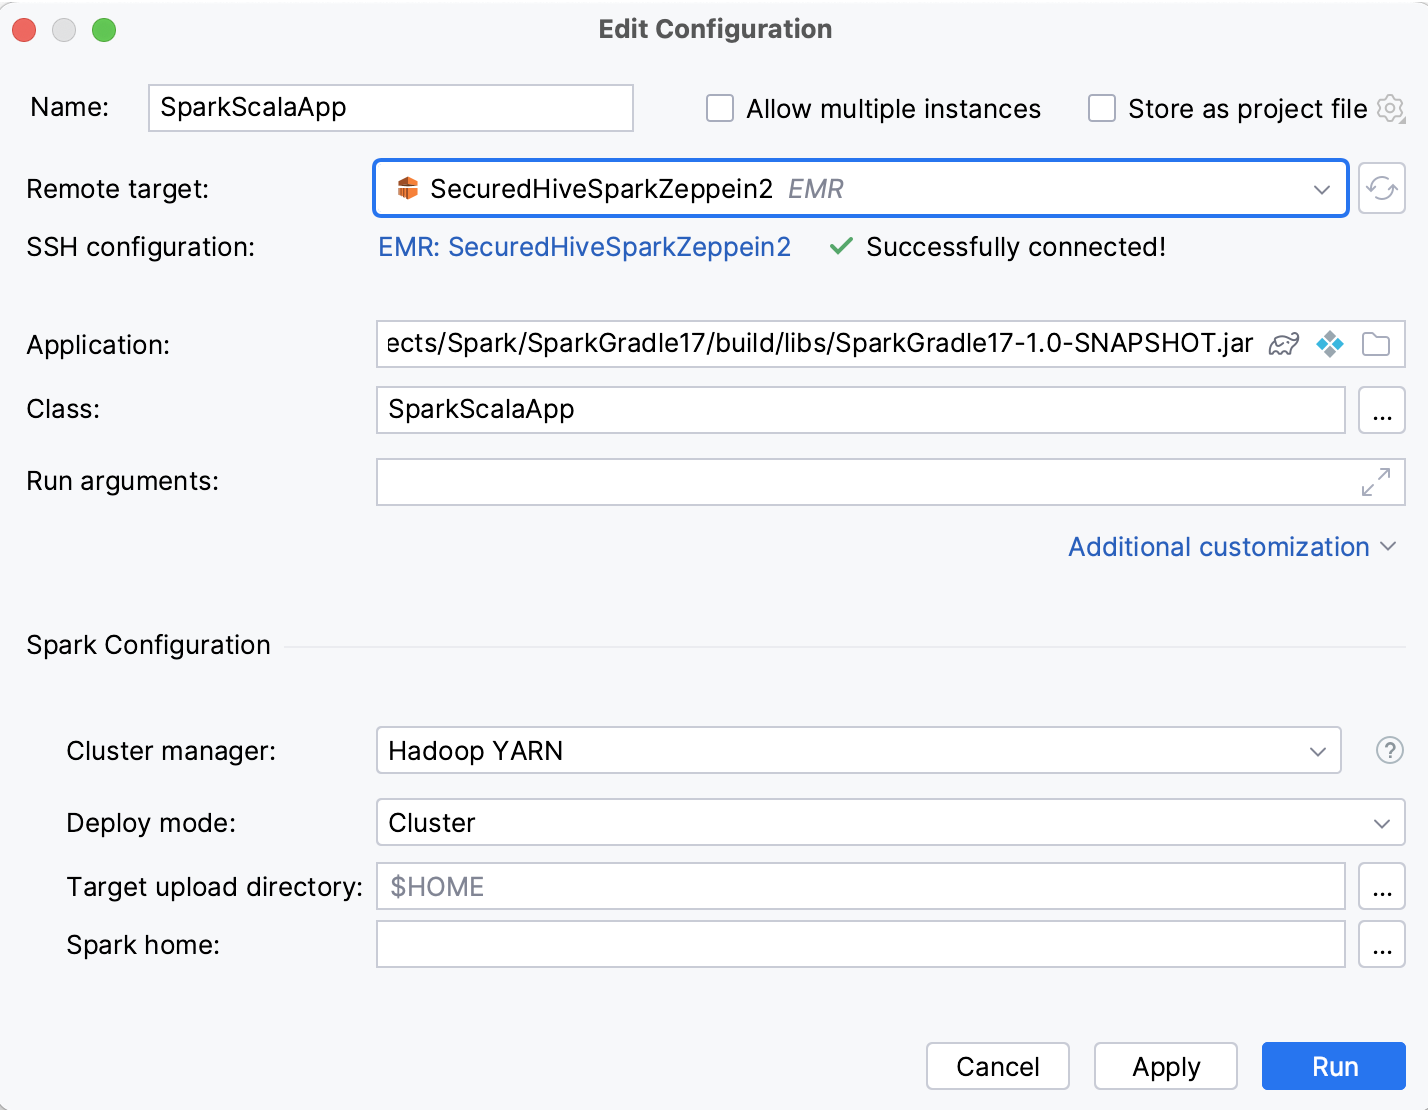
Specify the following parameters of the run configuration:
In the Remote target list, select an AWS EMR cluster. IntelliJ IDEA suggests clusters that have a Spark History server running on them.
In Application, click
and select a Gradle artifact.
When you run this configuration, IntelliJ IDEA will build this artifact and then upload it to AWS EMR. You can see the corresponding Run Gradle task and Upload Files Through SFTP steps in the Before launch section.
Click Additional customization, enable the Spark Configuration section and, in the Cluster manager list, make sure Hadoop YARN is selected.
Click Run.

This will open the Run tool window with the Gradle task. Once the artifact is built, the Spark Submit task opens in a new tab of the Run tool window.
For more information about this run configuration, refer to Spark Submit run configuration.
If your application is successfully uploaded to AWS EMR, it will be available in the Spark History server. You'll see the corresponding notification in the Run tool window. You can open it in a browser or in the dedicated Spark monitoring tool window.
In the Run tool window, click Open monitoring in the notification that opens.
note
If you don't have a Spark connection yet, click Create connection instead. You can then click Create default to create a default Spark connection based on the AWS EMR cluster settings.
Alternatively, you can click tracking URL in the run configuration output in the Run tool window.

For more information about the Spark monitoring tool window, refer to Spark monitoring.
If you submit a Spark application to a YARN cluster, it is run as a YARN application, and you can monitor it in the dedicated Hadoop YARN tool window (provided by the Metastore Core plugin). This is what we did in our tutorial when we selected Hadoop YARN as a cluster manager in the Spark Submit run configuration.
tip
If you have not configured Hadoop YARN connection yet, refer to Hadoop YARN.
Open the Hadoop YARN tool window: View | Tool Windows | Hadoop YARN. If you have multiple Hadoop YARN connections, select the needed one using tabs on top of the tool window.
Open the Applications tab and locate your application using the Id column.
Click the address in the Tracking url column.
If you are not redirected to the Spark monitoring tool window, a notification about a missing connection will appear. Click either Select connection to select an existing Spark connection, or More | Create connection to create a new connection.

This integration with Spark is configured in the Hadoop YARN connection settings. To check or change it, open the Hadoop YARN connection settings (by clicking in the Hadoop YARN tool window or
in the Big Data Tools tool window) and select a Spark connection in the Spark monitoring list.
For more information about the Hadoop YARN tool window, refer to Hadoop YARN.
Thanks for your feedback!