Migrate from VS Code to RustRover
In this section, you will find some tips on how to migrate from Visual Studio Code (VS Code) to RustRover.
Import settings
To help you recreate your previous setup, RustRover allows you to import settings from your VS Code instance. This includes your keymap, a UI theme set, installed extensions, and recent projects.
When you launch your RustRover for the first time, you will see the Import Settings dialog with the list of other IDE's settings found on your machine.
Select Visual Studio Code to import settings.

Select which settings you want to import and click Import Settings.

You will see a confirmation that the settings have been successfully imported.
Configure shortcuts
If you have never used RustRover or other JetBrains IDEs before, getting used to new shortcuts can be challenging. Here are a few tips that can help you with that.
Switch to the VS Code keymap

Learn RustRover shortcuts
Learning RustRover shortcuts will come in handy even if you decide to switch to another JetBrains IDE later on – the shortcuts are the same in almost all of them. Here is what can help you learn them faster:
Memorize RustRover’s most universal shortcut – double Shift or Search Everywhere. You can use it to find any file, action, type, or symbol, and see all the matches in one place.
Install Key Promoter X – this extension helps you learn essential shortcuts while working. When you use the mouse on a button inside the IDE, Key Promoter X shows you the shortcut you could have used instead.
Set up your work environment
One of the key differences between RustRover and VS Code is that you do not need to install a lot of extensions to make RustRover more powerful. Just about everything is already there: language support, VCS, the debugger, support for web frameworks and databases. All you need to do is install the Rust toolchain.
For a general overview of the features RustRover offers, check out this page.
Replicate common VS Code workflows
Let’s see how you can set up a few things to work like they do in VS Code.
Opening/creating projects
One of the first things that you will notice once you download and install RustRover is that you need a project to get started. The project-first approach helps RustRover understand the context better and provide more advanced coding assistance.
To start with your first project, you can choose one of these options:

New Project: create a project using one of the predefined templates.
Open: open a project stored on your machine.
Clone Repository: get an existing project from a remote repository on a VCS hosting service like GitHub.
Once you have opened a project, you can start coding as usual.
Using command palette
Search Everywhere is your replacement for Command Palette in VS Code. You can use it to search for files, actions, classes, or symbols. All matches are displayed in a single location.
To open the Search Everywhere dialog, press Shift twice.

Search and replace
Although RustRover’s search and replace workflow is slightly different from the one in VS Code, the principles are the same. RustRover lets you find and replace text strings within both specific files and entire projects.
To begin, navigate to in the main menu. Select to search within the current file or to search the whole project. For text replacement, select or from the same submenu.

Running code
Just like VS Code, RustRover allows you to run binaries, tests, and benchmarks from the gutter.

RustRover provides various ways to run your code. Under the hood, all of them rely on run/debug configurations. By creating a custom run/debug configuraion, you gain the utmost freedom and flexibility. Learn more in Run/debug configurations.
Change the defaults for the Project view
RustRover has its own Explorer, the Project tool window, and it works a bit differently. For instance, you need to double-click a file to open it in the editor. Here is how you can change the default setup to match what you were used to in VS Code:
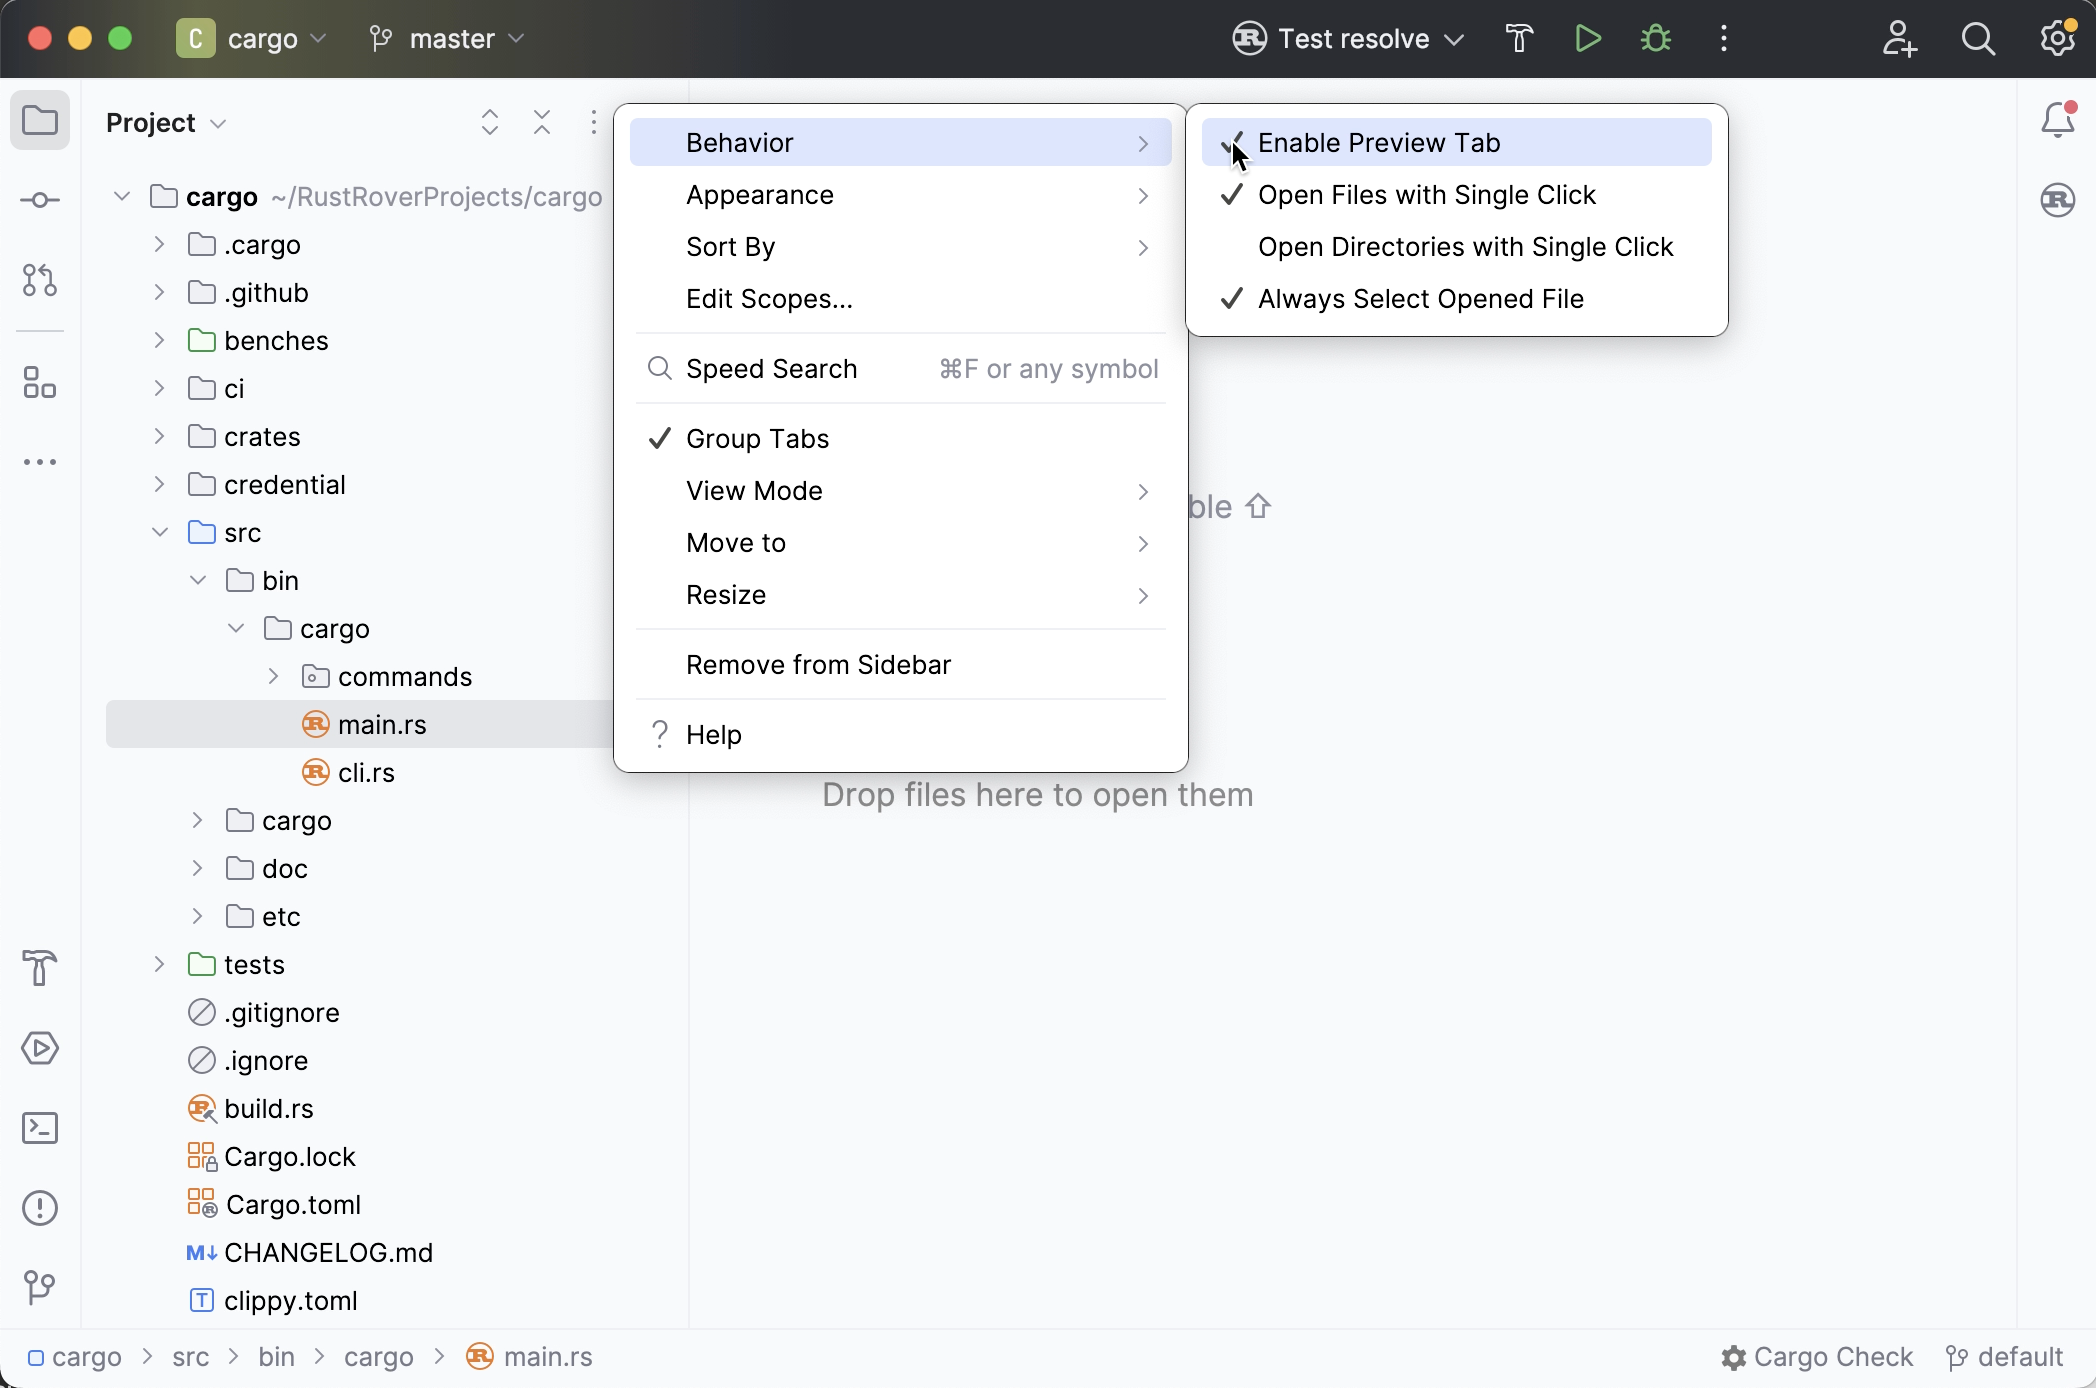
You can go to the Project tool window settings, click Behavior, and select any or all of these options:
Enable Preview Tab: preview files you have selected in the Project view in the editor.
Open Files with Single Click: open files in the editor with one click.
Always Select Opened File: auto-select the file that is currently open in the Project view.
Enjoy RustRover features
RustRover has lots of great features to explore. Here are some handy ones to begin with.
Rich UI
RustRover has a powerful UI. There's hardly anything you cannot do from the UI, from running actions to configuring settings.

To help you learn the UI, we've placed links to RustRover's online help pages throughout the interface. Whenever you want to learn more about a specific tool window, dialog, or settings page, press F1 or look for the ![]() button (in the bottom left corner of the window or under the three dots menu) – this will open the relevant help page in your browser.
button (in the bottom left corner of the window or under the three dots menu) – this will open the relevant help page in your browser.

Cargo tool window
The Cargo tool window allows you to manage workspace members and targets. By default, it is pinned to the tool windows bar and opens automatically on project load. You can also access it via .
To run a target, simply double-click it. Use the toolbar to refresh Cargo projects ![]() , run Rustfmt
, run Rustfmt ![]() or an external linter
or an external linter ![]() . You can also quickly execute any Cargo commands
. You can also quickly execute any Cargo commands ![]() .
.
For more information, check out the Cargo tool window page.
On-the-fly code analysis
In RustRover, you don't have to run linters to validate your code. The IDE is equipped with a code analysis engine that runs as you type, highlighting anomalous code, pointing to potential compiler errors, suggesting possible fixes, optimizations, and better syntax. For more information, refer to the Intention actions page.

Cargo Check and Clippy are also supported. You can run them manually or configure the IDE to keep them running on the fly. Learn more in External linters.
How to get support
You can always get in touch with our support team if you get stuck. To submit a new ticket, select from RustRover’s main menu. To report a bug or ask for a new feature, create a new issue here.