Configure Your Project
This guide is for namespace administrators – users with the Namespace Admin role in a namespace responsible for preparing a project for remote development.
A namespace groups all project-specific resources like Git repositories, dev environment templates, and custom settings. A namespace can represent a single project or a group of related projects. Learn more about namespaces
As a namespace administrator, your task is to connect the project’s Git repository, configure how dev environments are created and started, and ensure the team can begin working without friction. Let's get your namespace up and running smoothly!
1. Create a namespace
If your company policy allows you to create namespaces, you can do it yourself. Otherwise, ask your system administrator to create a namespace for you and proceed to the next step.
Select Namespaces on the header navigation, then select All namespaces in the sidebar menu.
Click New namespace and specify the namespace name and other settings.

Learn more about namespaces.
2. Connect a Git repository
CodeCanvas doesn't provide Git hosting, so you should connect the project with a Git repository hosted elsewhere. When a dev environment is created, it will receive a clone of the connected repository.
In our example, let's connect a GitHub repository. In the documentation, you can also find instructions for GitLab, Bitbucket, and other Git hosting services.
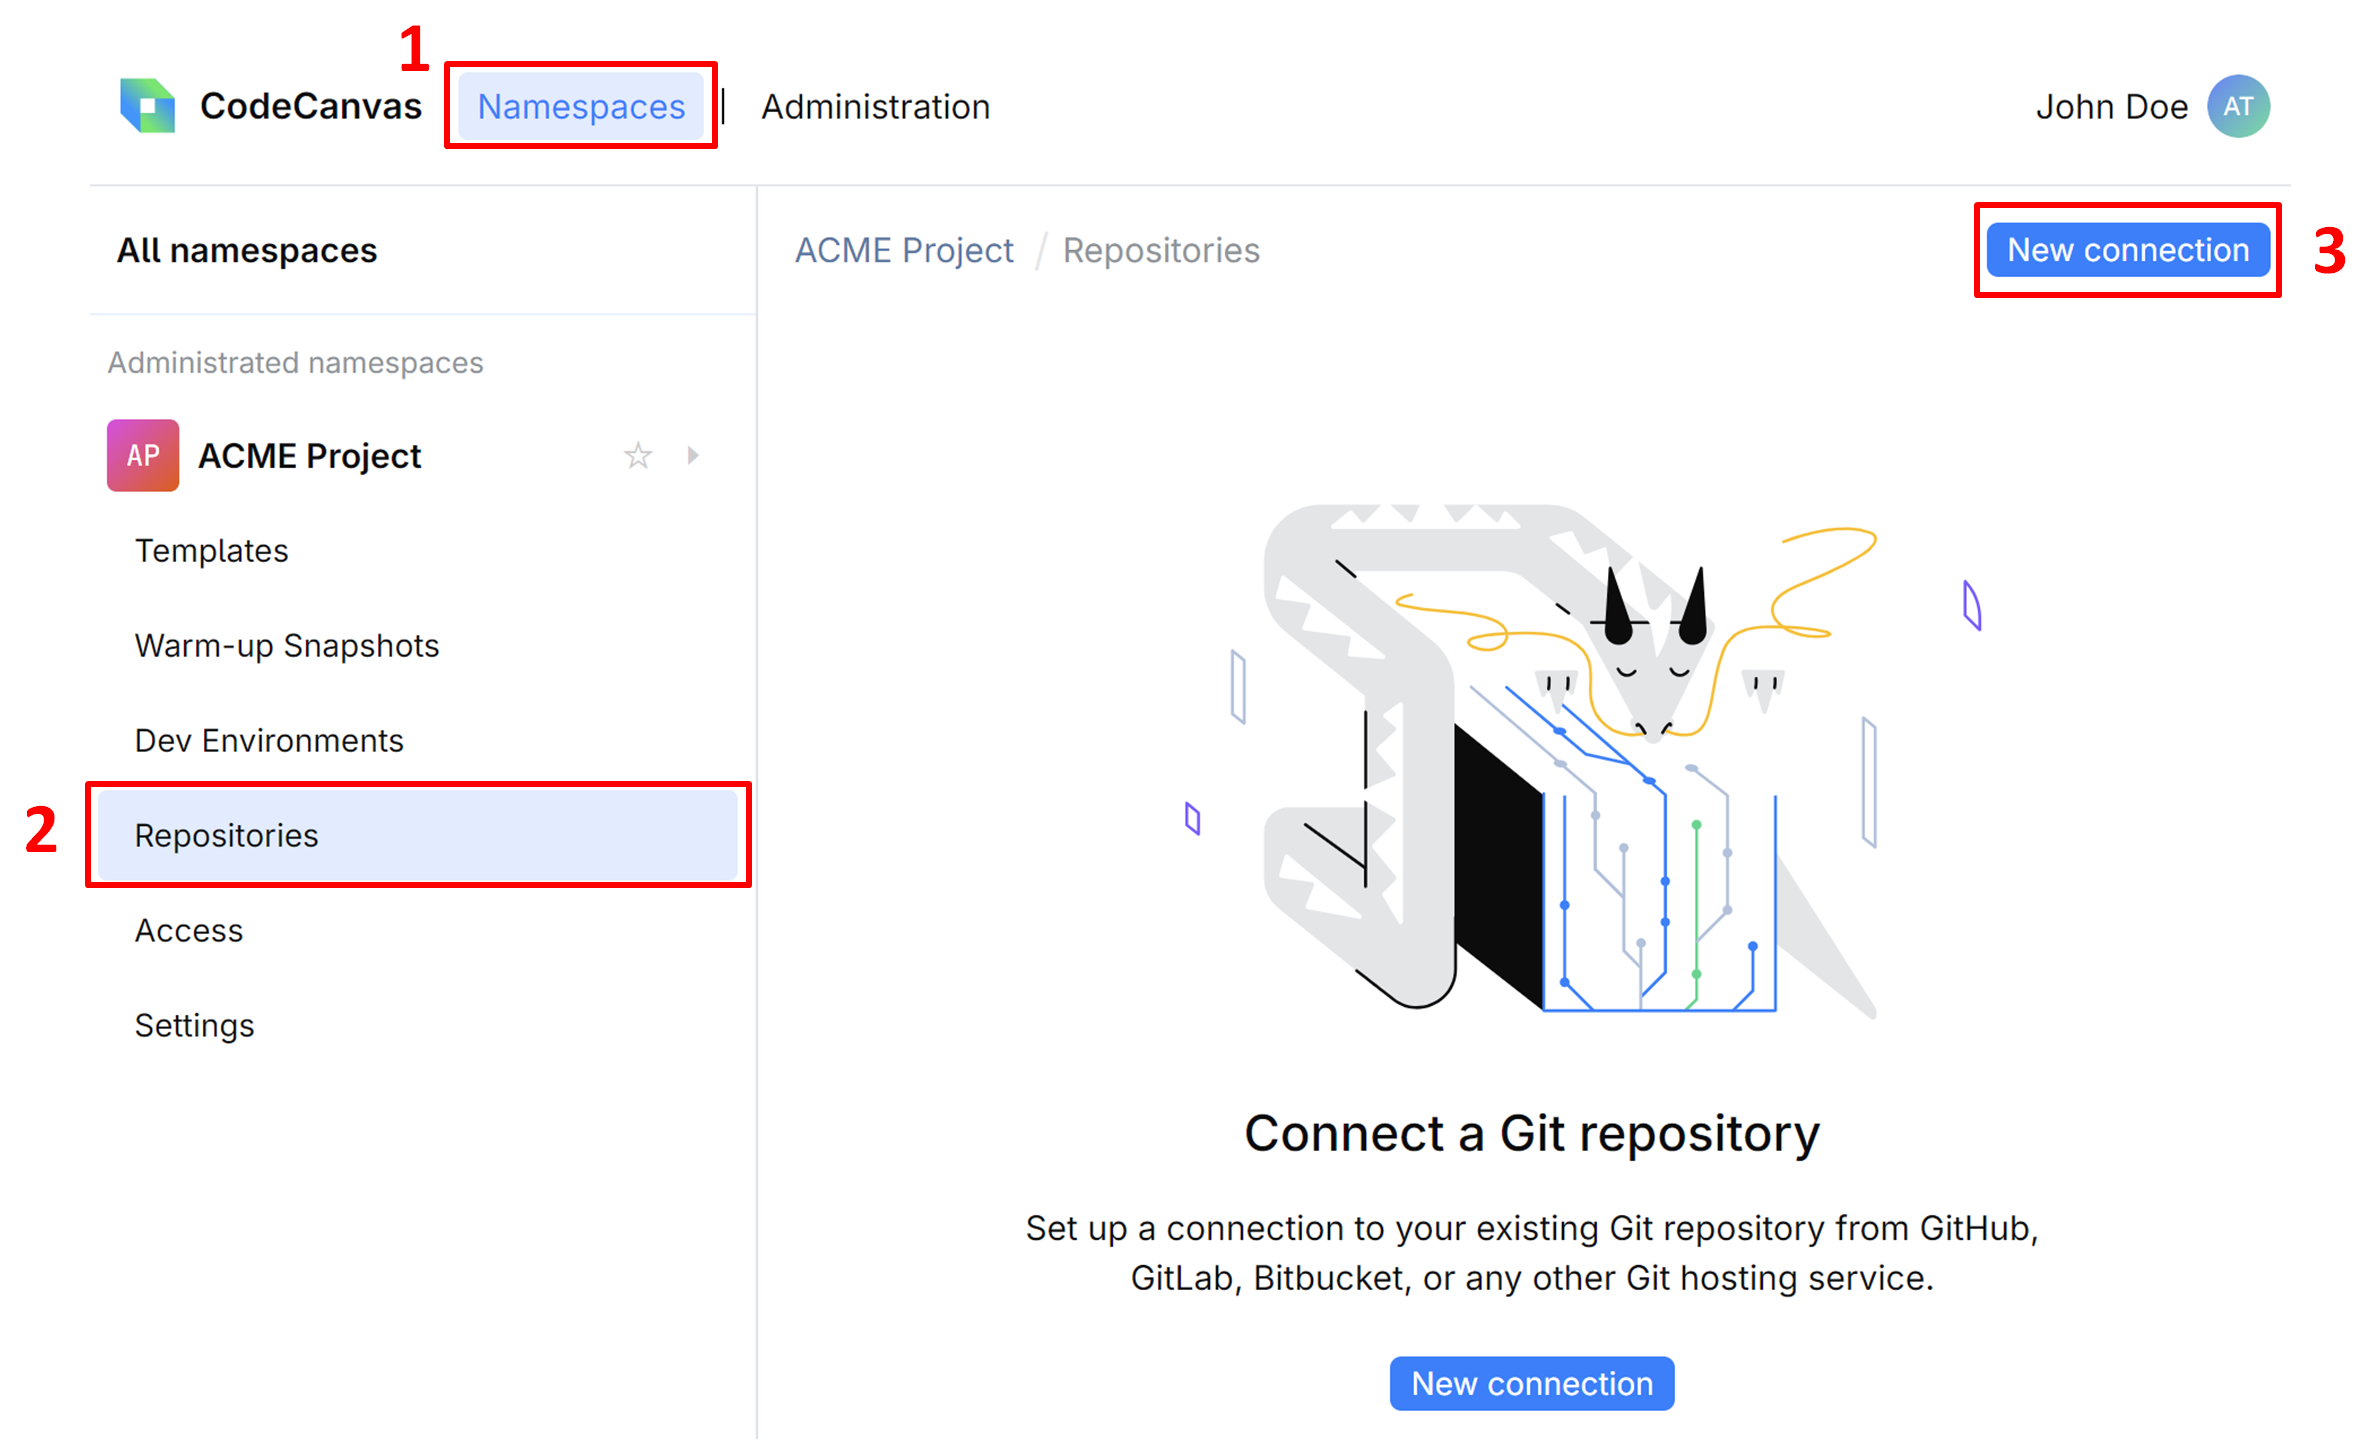
In the header navigation, select Namespaces, then the namespace you need.
In the sidebar namespace menu, select Repositories.
Click New connection.
Provide a repository Name and other settings:
Remote repository URL – the SSH or HTTPS URL of the repository, e.g.,
git@github.com:MyCompany/my-project.gitorhttps://github.com/MyCompany/my-project.gitRepository web URL – the URL of the remote repository's web interface. CodeCanvas will show this link in the repository list. For example, this can be a link to the project's README file on GitHub.
Access control – leave All users or choose Only selected users and specify the users allowed to read the repository contents. In this case, this list must be synced with the list of allowed users on the Git server.
If the repository doesn't require authentication, leave Anonymous in Authentication and click Connect. Otherwise, choose either SSH (for SSH authentication) or Password (for HTTPS authentication).
For SSH authentication, you need to provide an SSH key pair. CodeCanvas will use the private key only to clone the repository into dev environments. Users will be required to specify their own SSH key to pull from and push to the repository.
The easiest way is to make CodeCanvas generate a new SSH key pair for you.
In the Authentication field, select SSH and ensure Auto-generate SSH keys is turned on.
Click Connect and copy the generated public key.
On your remote Git server, add the public key to the list of authorized keys.
For GitHub: Go to the repository | Settings | Deploy keys and click Add deploy key. Paste the public key into the Key field and click Add key.
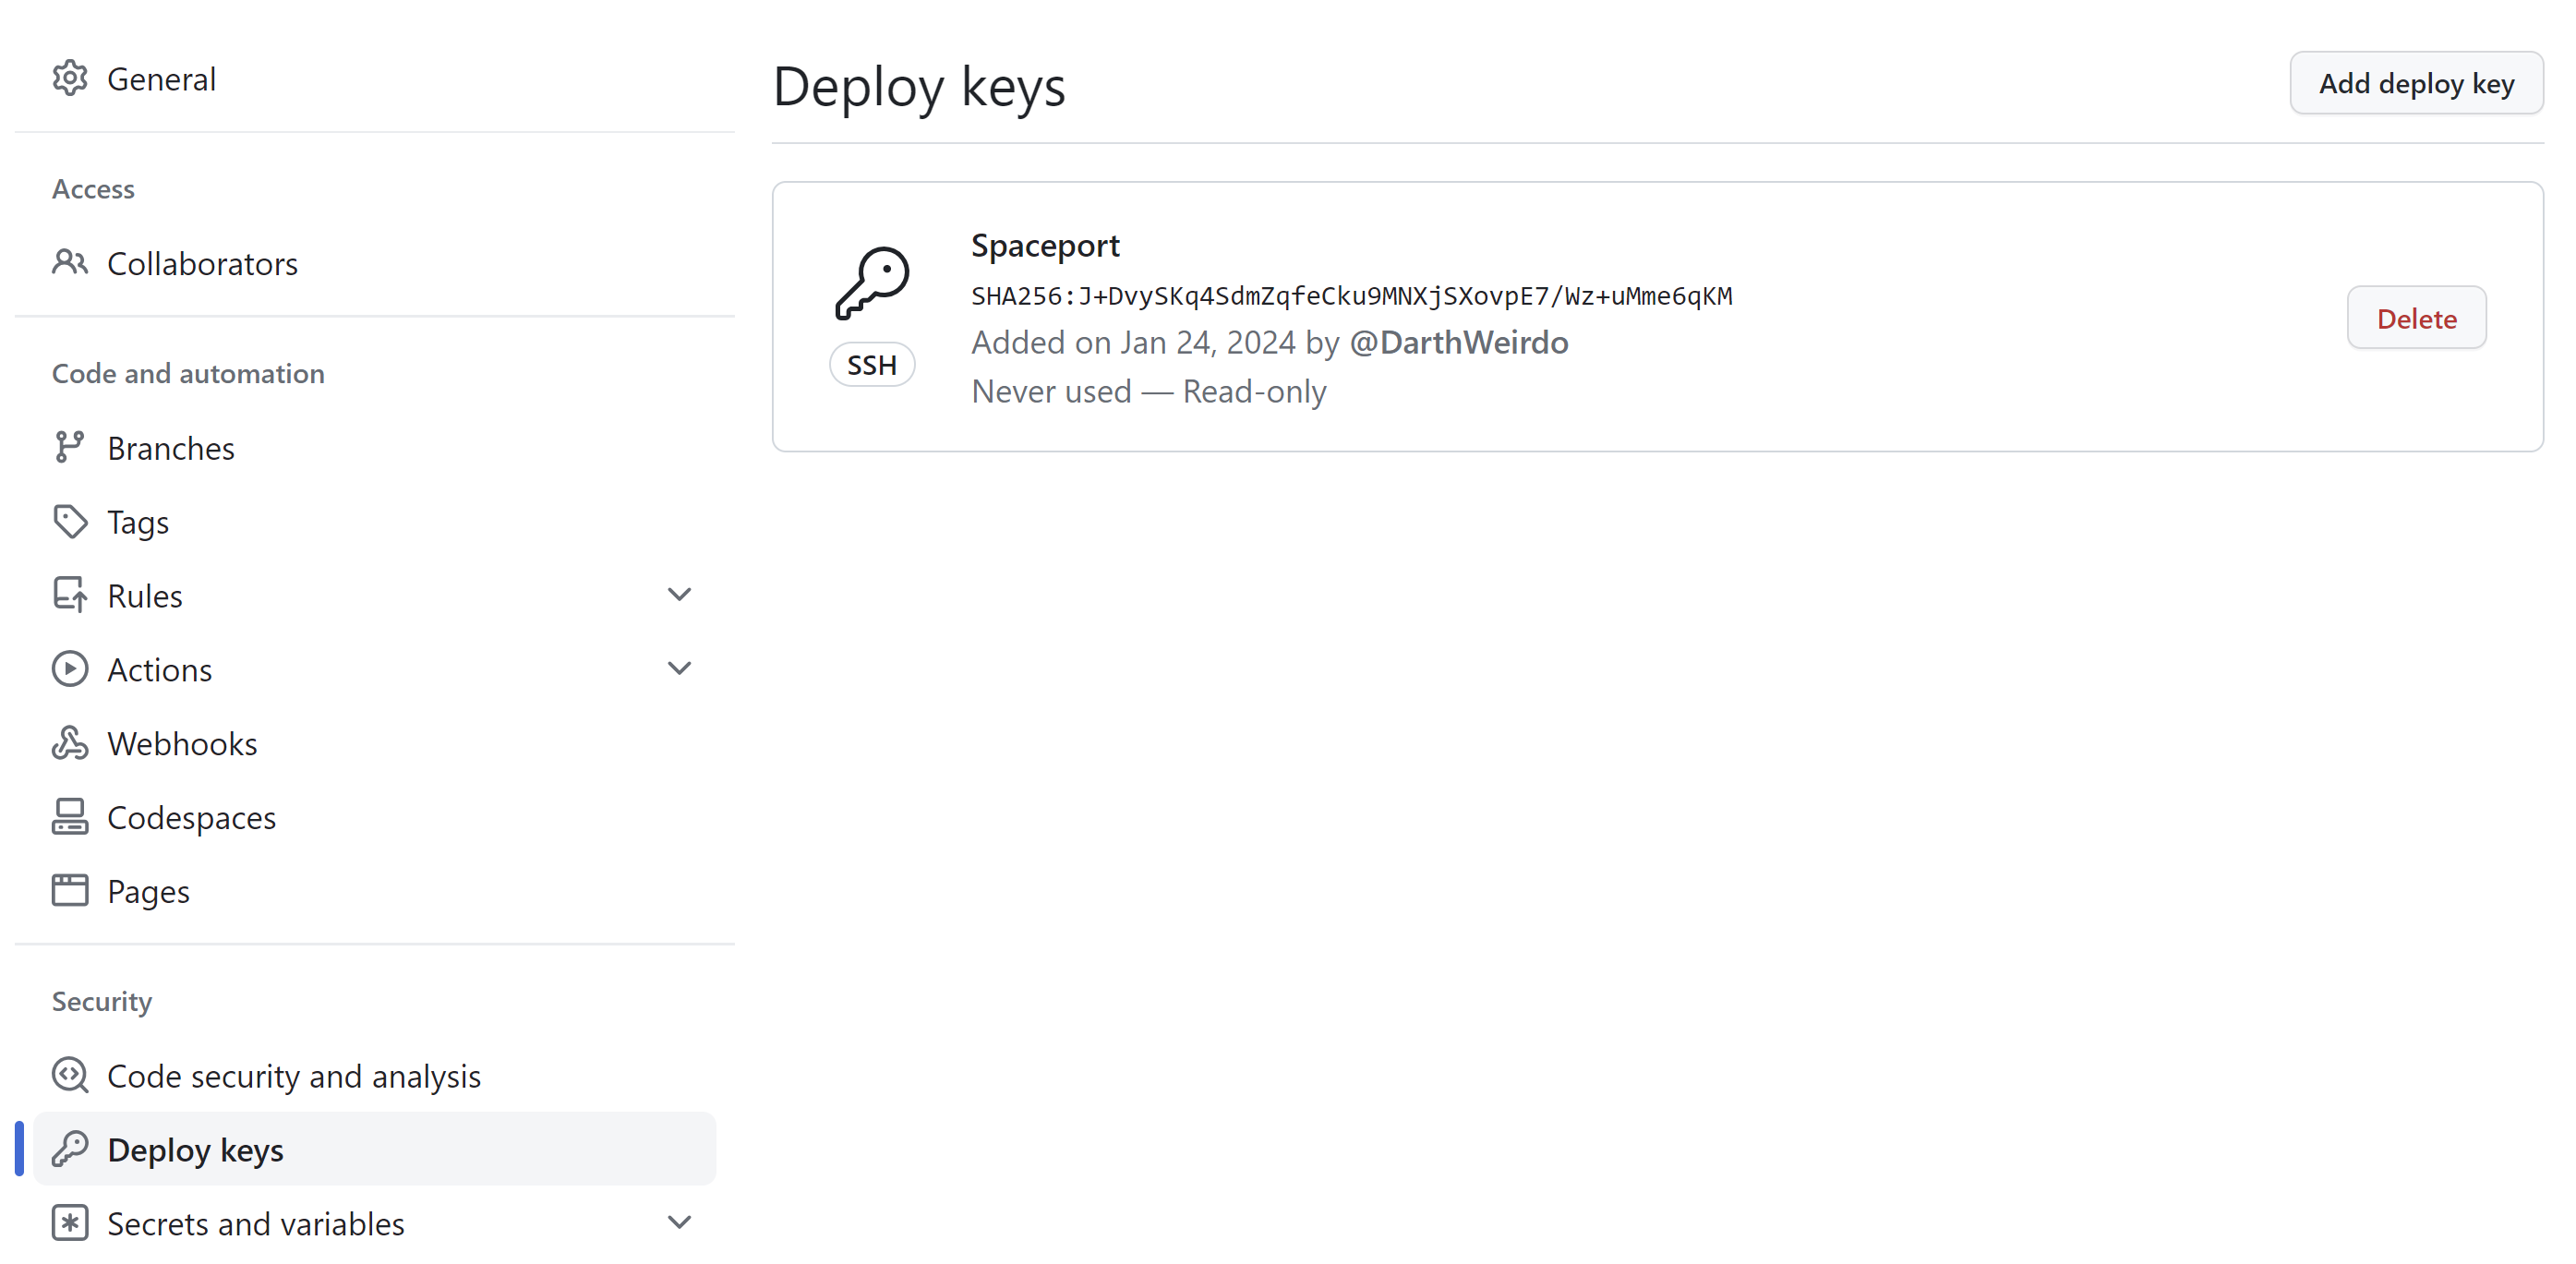
You can first Test connection, and if everything is OK, click Connect. After this, the repository will appear in the Repositories list.
In CodeCanvas, in the Authentication field, select Password and provide the username and password for the remote Git server.
For GitHub, you can generate a personal access token and use it as the password. CodeCanvas will use this token only to clone the repository into dev environments. Users will be required to specify their own GitHub credentials to pull from and push to the repository.
On GitHub, go to your profile | Settings | Developer settings | Personal access tokens | Fine-grained tokens and click Generate new token.

In Repository access, select Only select repositories and select the repository you want to connect.
In Permissions, in Contents, select Read-only.
Click Generate token.
Copy the token and specify it in CodeCanvas as a repository Password and your GitHub username as Username.
You can first Test connection, and if everything is OK, click Connect. After this, the repository will appear in the Repositories list.
3. Create a dev environment template
A dev environment template is a set of settings that define how a dev environment should be created. For example, it can specify the base image (toolchains, runtimes, etc.), the resources allocated to the dev environment, Git repositories and branches to clone, and other settings. When a user creates a new dev environment, they're asked to select a template.
Select Namespaces on the header navigation, then in the sidebar menu, select the namespace you need.
In the namespace sidebar menu, select Templates and click New template.

Provide the template Name and Basic settings:
Repositories – the Git repositories to clone into user dev environments. Here, you can select repositories you've connected in the previous step or add a new repository connection.
Instance type – defines the resources allocated to user dev environments. The list of available instance types is configured by the system administrator. Learn more
IDE and IDE version – the IDE and its version that will be used to open your project in user dev environments. The list of available IDEs and versions is configured by the system administrator. Learn more
Click Next and provide other settings:
Project settings
Checkout branch – the branch to clone from the repository. If you want to clone the default branch, leave it empty.
Project roots – the path relative to the project root directory that will be opened in the user IDE. This path will be used as the working directory.
Environment variables – additional environment variables available in the user dev environment. Here, you can click Add variable and provide its Name and Value. Don't use this setting for providing sensitive data like passwords or tokens!
IDE plugins – a list of plugins that will be installed in the IDE. Specify the plugin ID as it appears in the JetBrains Marketplace. Learn more
Startup performance
Here, you can configure the Warm-up and Standby pool features. This is an optional step, but it can significantly improve the startup performance of user dev environments. We will cover them in the next steps.
Access
Specify who is allowed to create dev environments based on this template: Only selected users or All users (conditions apply). Users outside this list won't see this template in their JetBrains Gateway client.
Important! This setting must be aligned with the read restrictions of the connected repository. Users who aren't in the Read restrictions and Access lists won't be able to create dev environments.
Lifecycle scripts
Here, you can provide shell scripts that will run during the dev environment lifecycle. For example, you can use them to configure some automation tasks, personalized environment, or any other custom actions. For details, refer to Dev Environment Lifecycle.
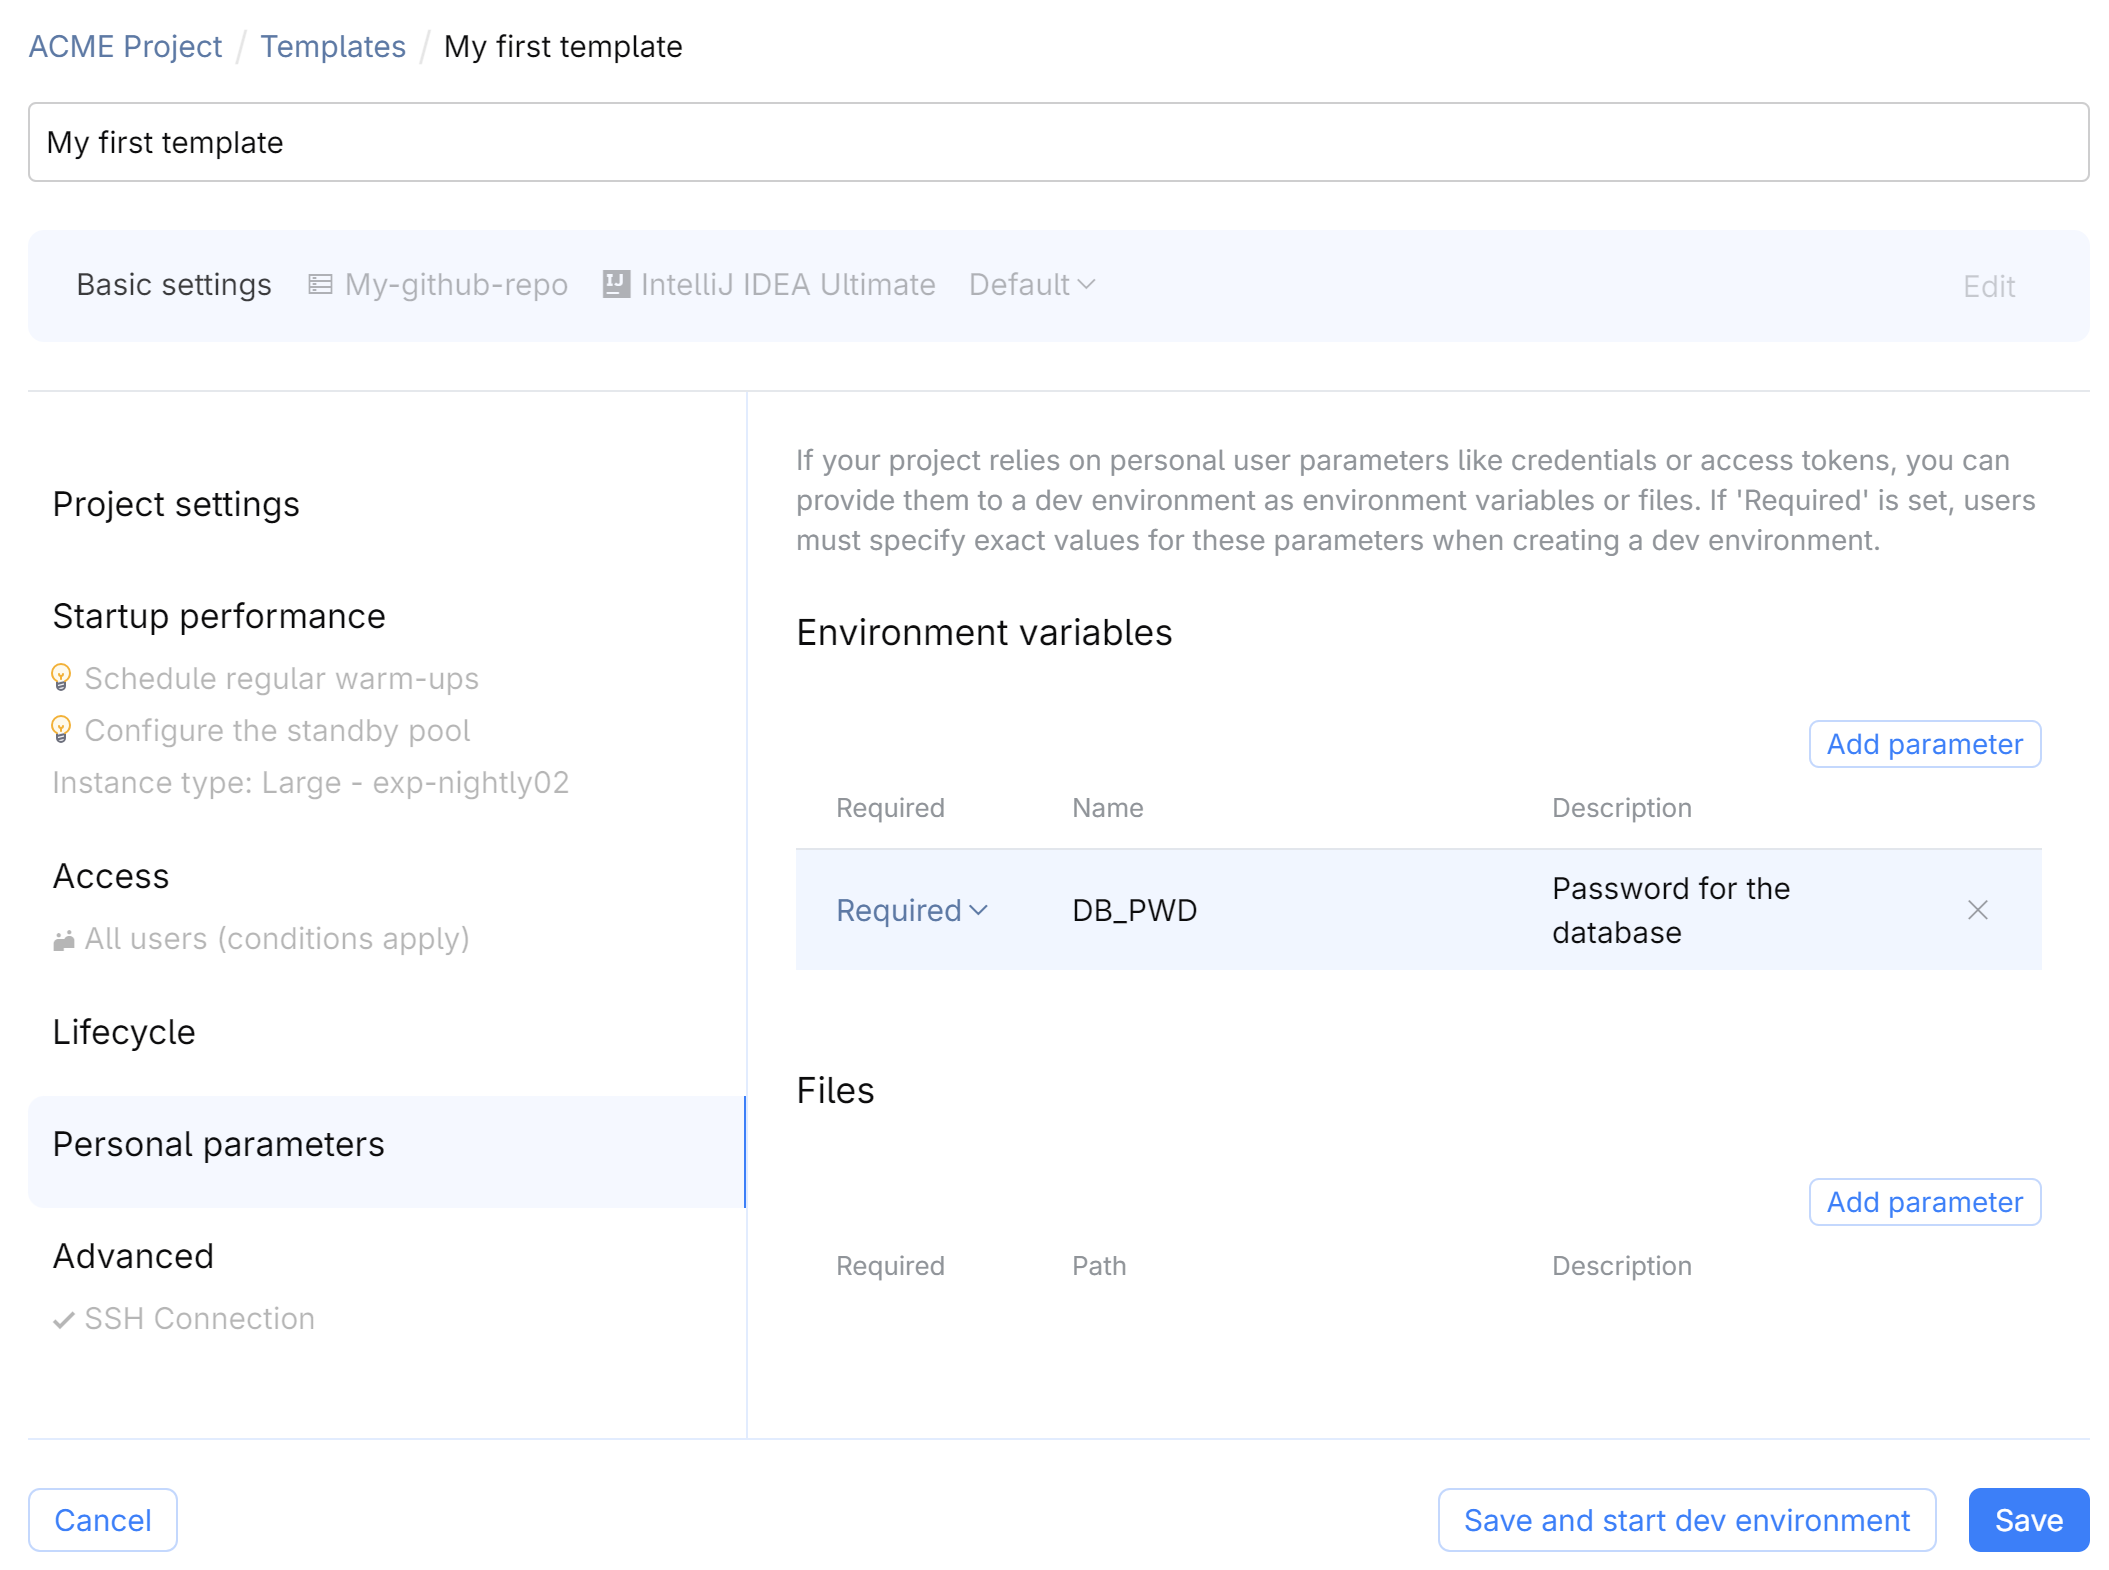
Personal parameters
If your project requires some sensitive data like passwords or tokens, you can require users to provide them when creating a dev environment. Inside a dev environment, these parameters will be available as environment variables or files.
For example, you can create an environment variable
DB_PASSWORDand mark it as a required parameter. When a user creates a dev environment, they will be asked to link a corresponding secret from their personal storage to this parameter.Learn more about personal parameters.
Advanced
SSH access – choose this option if you want users to be able to access the dev environment via SSH. If you use a custom dev environment image, ensure it provides an SSH server like
sshd.VM Options – additional JVM options for the user IDE. Probably, the most important option for IDE performance is
-Xmx, which defines the maximum memory size allocated for the user IDE. The default value is calculated automatically based on the amount of memory available in a dev environment.Dev container image – a full name of a Docker image that will be used to create user dev environments. Make sure it provides all the necessary toolchains and runtimes for your project. If you don't specify an image, CodeCanvas will use the default image that includes almost all the popular toolchains and runtimes.
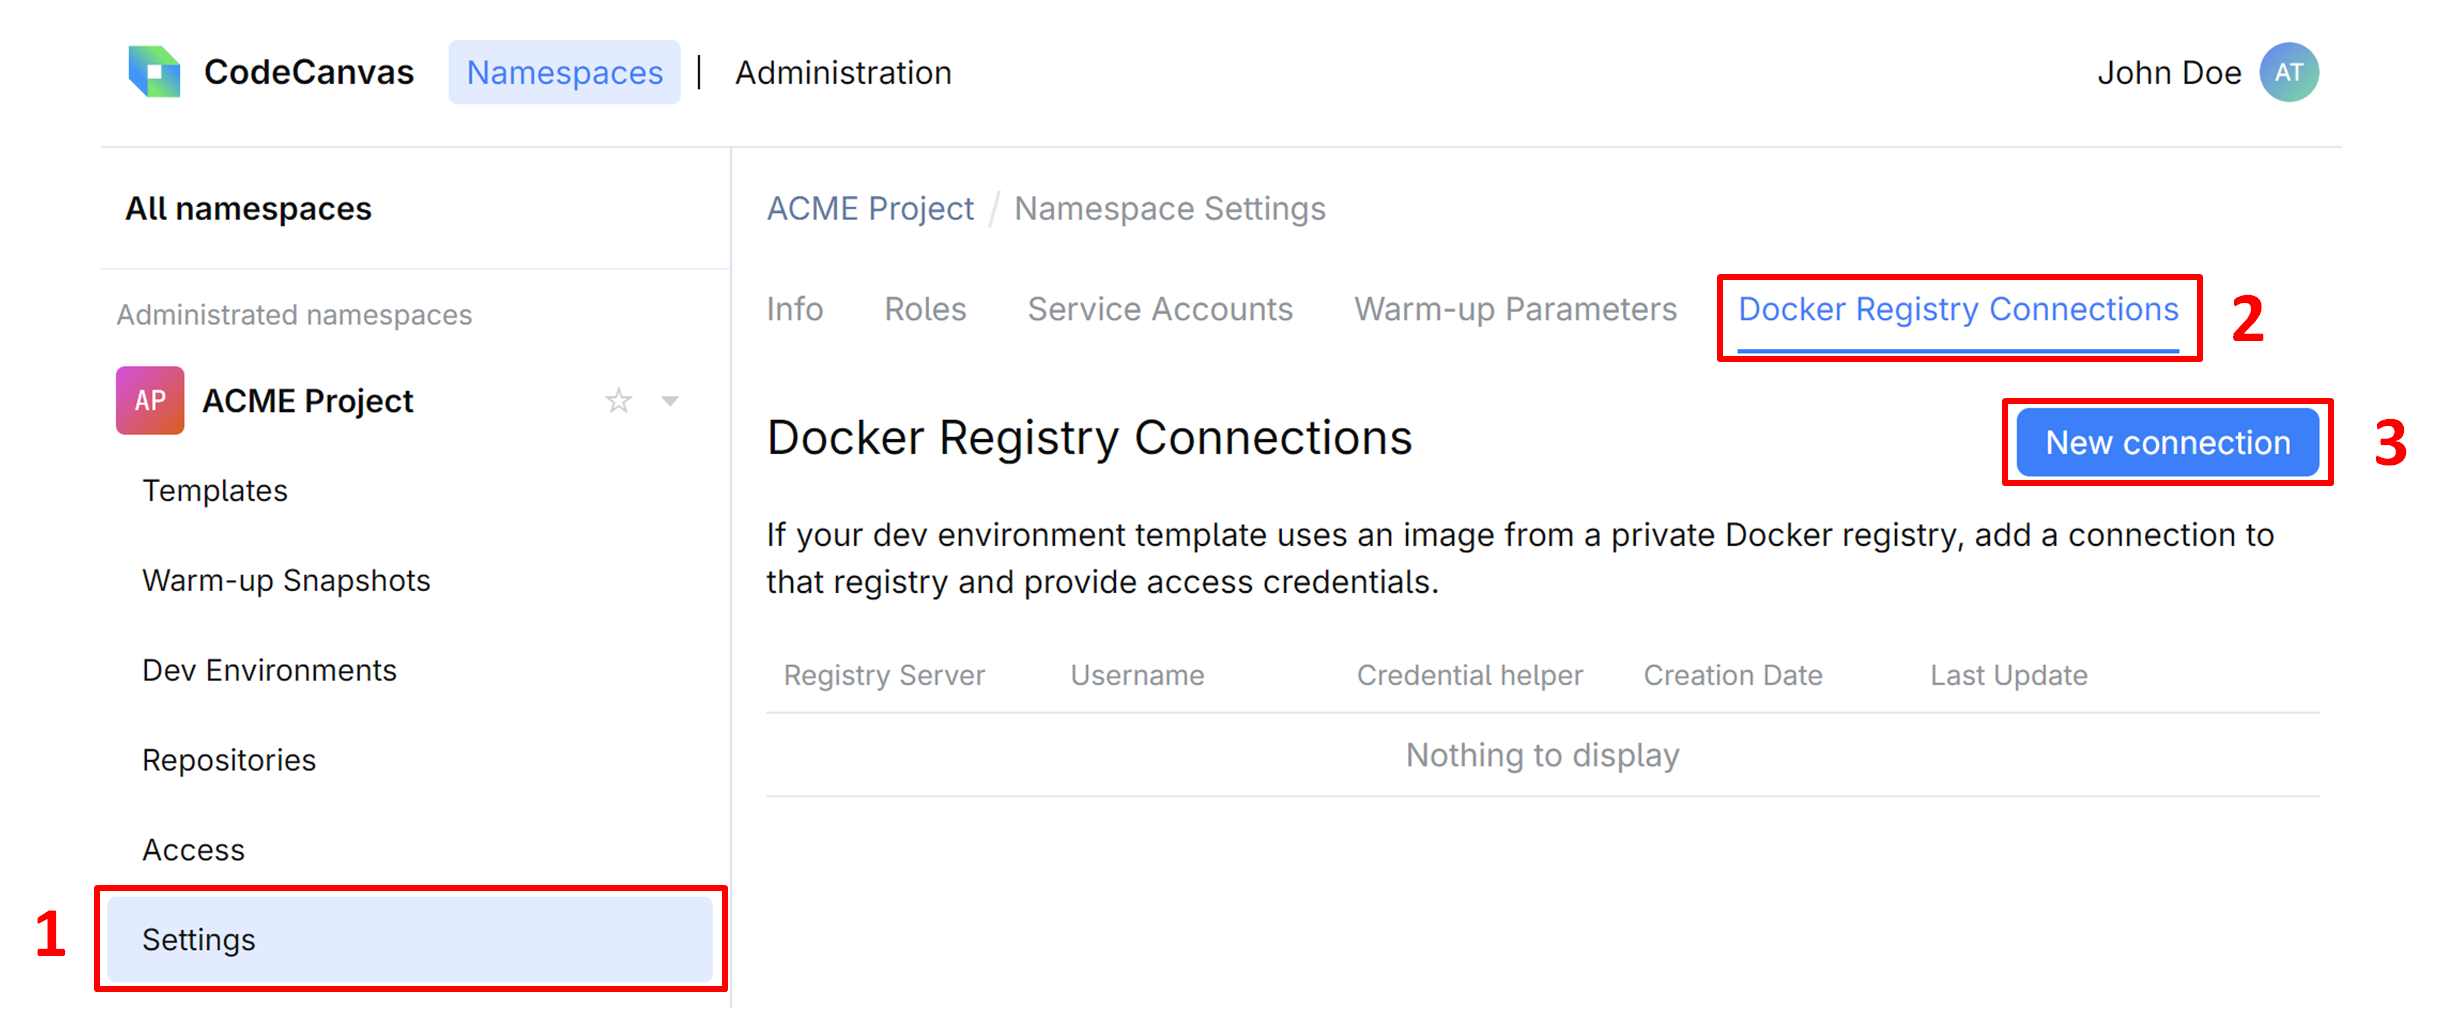
If your Docker registry requires authentication, you can provide the credentials in the namespaces Settings | Docker Registry Connections page.
Cloud policy – if the system administrator has configured seamless access to cloud resources via the cloud policies, you can select a policy here.
Click Create. After this, the template will appear in the template list.
(Optional, boosts startup) Configure warm-up
You can significantly reduce the initial IDE startup time by pre-creating warm-up snapshots. These snapshots can contain IDE indexes, project dependencies, and other data. When a user creates a dev environment, CodeCanvas will mount the warm-up snapshot to the dev environment, letting skip the project import, initial indexing, and build of the project.
When configuring the warm-up, you can specify the following settings:
Instance type – the resources allocated to the dev environment that will be used for creating the warm-up snapshot.
Create project indexes for IDE – if enabled, CodeCanvas will create IDE indexes for the project in the warm-up snapshot. Note that indexes created by different IDE versions might be incompatible. Generally, the compatibility is preserved among builds of a major version, e.g., 2023.3.X.
Run custom script – if enabled, the warm-up will run your custom shell script specified in Script. You can use this script to install project dependencies, build the project, and so on. The script runs in the Script working directory. Note that the script is run after the IDE indexes are created.
Execution timeout (minutes) – CodeCanvas stops the warm-up and considers it failed if it takes longer than the specified time.
Cron triggers – turn on Run warm-up on schedule and specify the schedule for creating warm-up snapshots. For example, you can create a snapshot every day at 3 AM, i.e.,
0 3 * * *Parameters – environment variables that will be available in the warm-up. Use them to provide sensitive data to the warm-up environment like user credentials or access tokens. Learn more
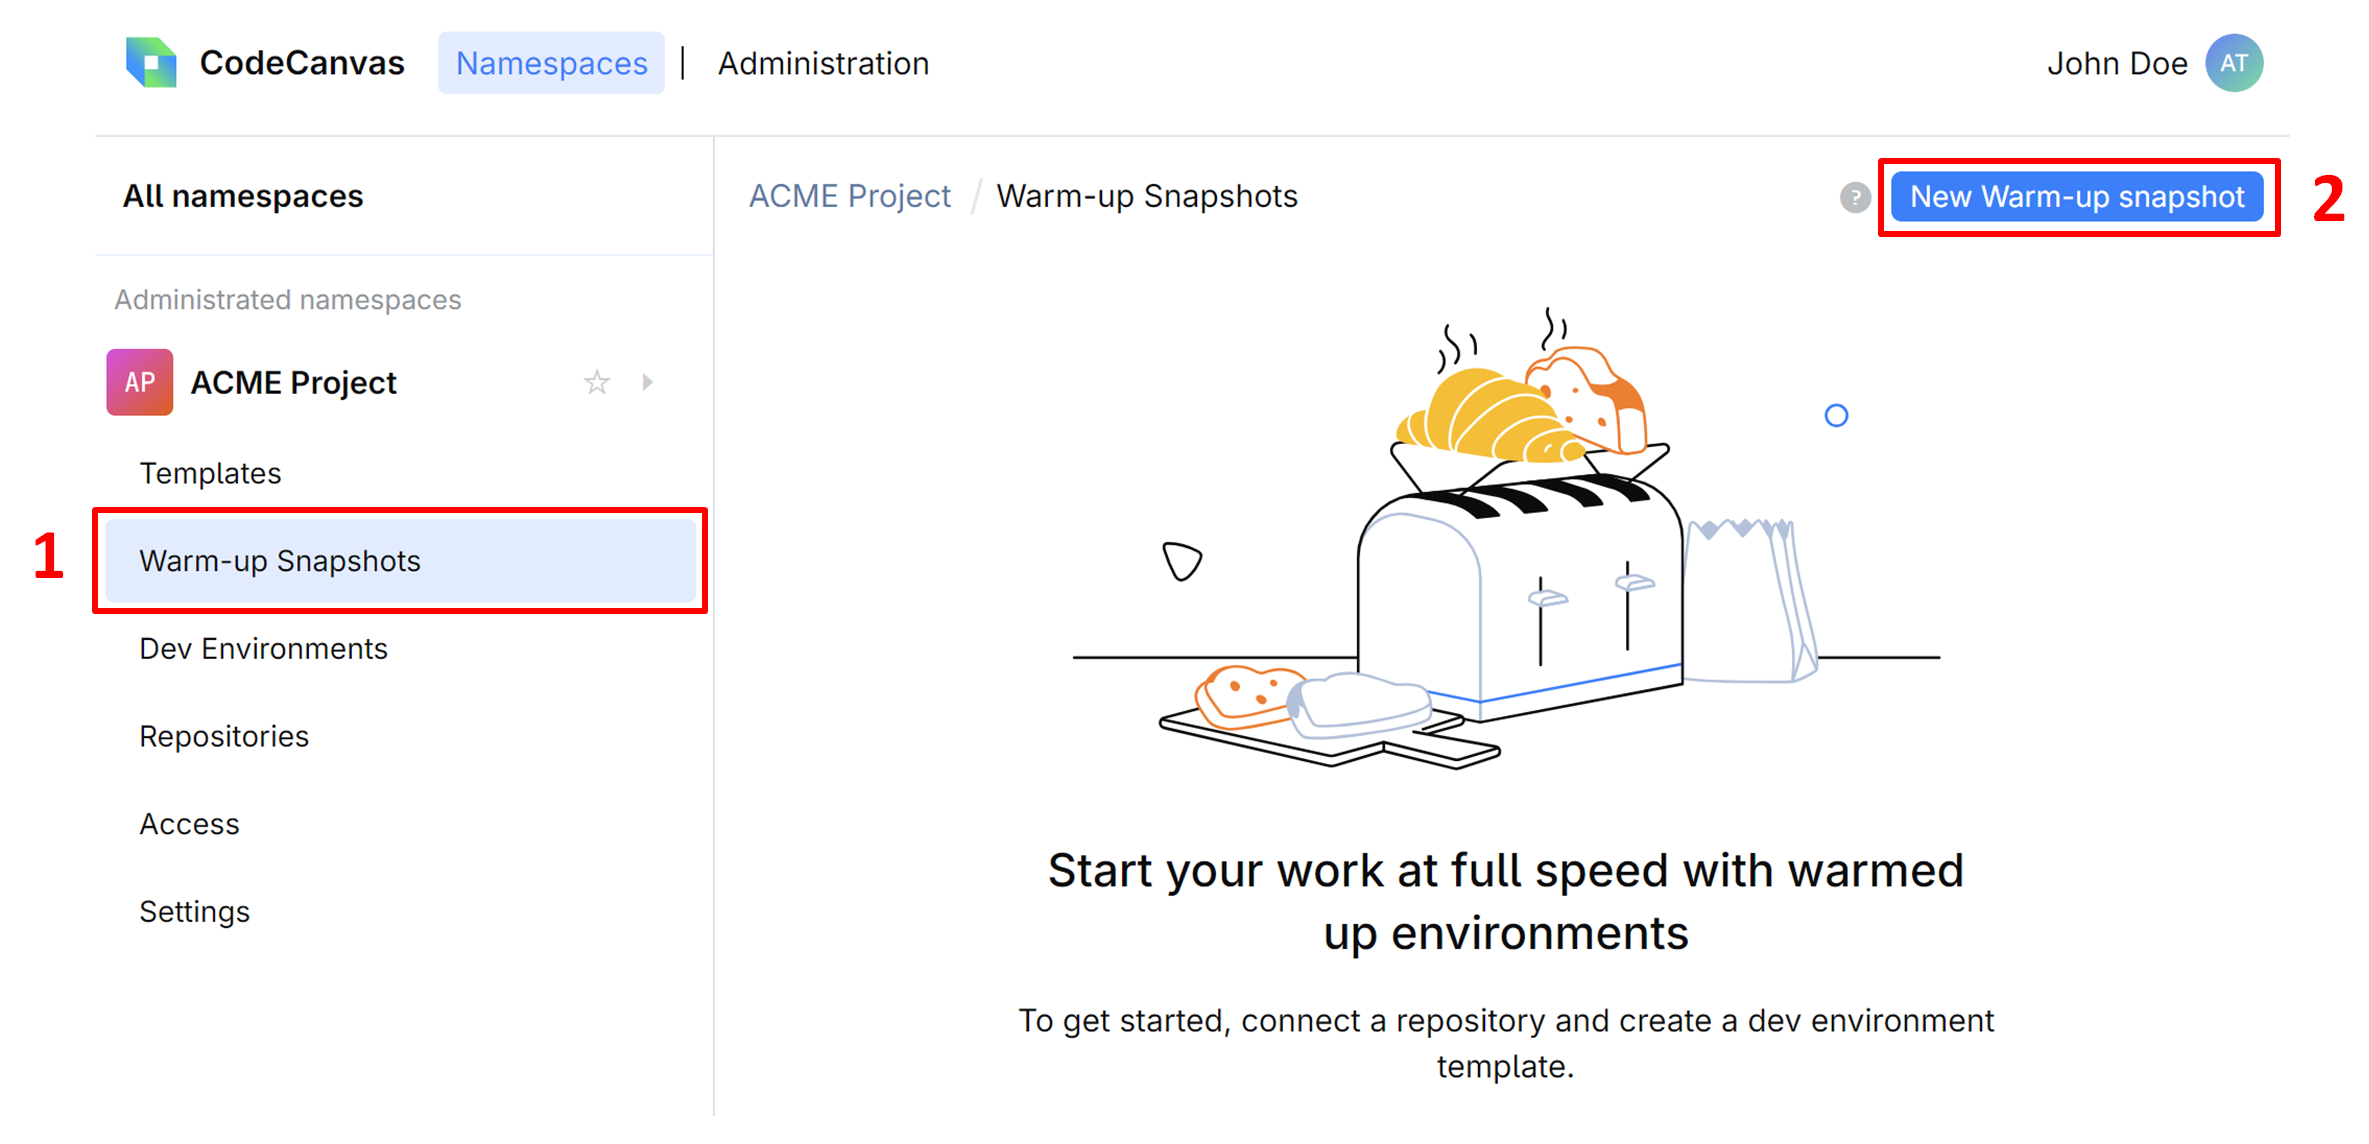
If you want to create a warm-up snapshot without waiting for the cron trigger, click New warm-up snapshot on the Warm-up Snapshots page. This page also shows the list of created snapshots and their status.
(Optional, boosts startup) Configure standby pool
Even if you use warm-up snapshots for the fast IDE startup, it still takes some time for CodeCanvas to allocate resources for a new dev environment, create a volume from the warm-up snapshot, and so on. The IDE also needs some time to load the project and become responsive. Standby pool eliminates this delay by pre-creating dev environments and keeping them running. When a user opens a dev environment, CodeCanvas takes a ready dev environment from the pool. Right after the dev environment is taken, CodeCanvas creates a new one to preserve the specified number of available dev environments in the standby pool.
To use the standby pool, select the Standby pool option and specify the following settings:
Size – the number of dev environments in the standby pool. For example, if a user takes a dev environment from the standby pool, CodeCanvas will instantly start creating a new one to keep the pool size.
Stop dev environments after initialization – this option can help you save compute resources while keeping a decent dev environment startup time. If enabled, CodeCanvas starts dev environments in the standby pool and waits until the IDEs are ready to use. After that, CodeCanvas unmounts volumes and stops the dev environments. When a user accesses a new dev environment, CodeCanvas mounts the volume from the standby pool to the dev environment and starts it. This way, users need to wait for the creation of the environment but not for the IDE initialization phase. The IDE is ready to use immediately.
Active hours and Cron timezone – a schedule (in the specified timezone) that defines active hours for the standby pool to keep the specified size.
What next
Now, your namespace is ready for other users. Note that in CodeCanvas, users don't work directly with namespaces – in their JetBrains Gateway client, they see only dev environment templates. Based on the templates you've created, users can create dev environments and start working on the project. How? Learn this in the Get Started as Dev Environment User guide.